photo c2f2b482954a36ed8e31b3782ddbd248_zpsce020d8c.jpg Home About Me Nail Care Disclosure Contact  photo e12a381ad30282bd4f39f6f699cd8a07_zpsbaf600bc.jpg
Sunday, January 26, 2014

Glam Polish - Maleficent


I swatched Maleficent by Glam Polish a few weeks ago, but never got around to posting the pictures. This polish is absolutely breathtaking, and finding the unused photos of this made me want to slap it right back onto my nails! It also really made me miss my long pretty nails :(


Maleficent is a stunning purple glitter polish with lots of holo sparkle with scattered splashes of red. Written description really doesn't do this polish justice, so just oogle the photos below!


RIP long nails. This line is no longer available on Color4Nails (which is good, I probably would have bought the rest of them if they were!) but be sure to sign up for their email updates so you can be prepared for restocks!

Wednesday, January 22, 2014

Tutorial: Gradient 101

I love doing gradients. It's fun to mix colors, they add complexity to even the simplest nail art, and are really fun (and easy!) to do. I posted the gradient below on my Instagram last week, and got an overwhelmingly positive response. A lot of the success of this gradient is due to choosing colors that go well together, and fade naturally, but I must admit that I've done enough gradients to have come up with a few tips and tricks that might help others. So, I decided to put together a gradient tutorial!


I realize everyone and their mom has either made or used another gradient tutorial at some point, but like I said, I've come up with some variations on what I followed when I first got started, and why not throw my hat in the ring. If you're in a hurry, you can just take a look at the pictorial below, but I really recommend reading the detailed steps beneath the photo.


Supplies: make up sponge, clean up brush, pure acetone, polish/acrylic paint for gradient, white/light neutral polish for base, quick drying top coat

Step 1: Paint your base color.
If the "first" color of your gradient (the color closest to your cuticle) is a very light or neutral color, (as shown in the pictorial and photo below) start out by painting your entire nail that color. If your're doing a gradient of all dark, bright, or neon colors, start with a white base--it will make your colors pop. Then, top with a quick drying top coat. This will keep your makeup sponge from sticking to your base!

Step 2: Paint your gradient colors on your makeup sponge.
Paint all the colors in your gradient in thin, barely touching lines directly onto the makeup sponge. If you used one of your gradient colors as your base, paint that color on the sponge too--this will help with blending.

Step 3: Apply sponge to nail.
Gently sponge the painted side of the sponge onto your nail several times, ensuring that the color is applied across the entire width of your nail. I will usually sponge press the sponge down 5-8 times, depending on which nail and how wide it is. Sponging repeatedly (rather than just one) will help you blend the colors.

Steps 4 & 5: Repeat!
Don't worry if your colors are faint or sheer after the first sponged coat. Trying to continually apply the same coat of polish will not help, and will probably end up lifting some of the polish you've already applied! Instead, let the first coat dry completely, then paint a new coat of polish onto your sponge, and apply multiple coats. Here I've done three, but it has taken up to five coats for me to do this in the past! Sponging on color in multiple coats won't build up as quickly as applying multiple coats normally, so you don't really have to worry about the polish getting thick or goopy. 

Step 6: Clean up, top coat, and embellish!
Dip a small make up brush (I love the elf small concealer brush, available at Target for $1) into pure acetone to clean up the skin surrounding your nail. I absolutely do NOT recommend using pure acetone for normal polish removal--it is extremely drying, and will just make your nails sad. But, for targeted cuticle clean up, it's definitely the most efficient route. Once you've removed the excess polish from your skin, apply a coat of your quick drying top coat. This will seal in your mani, and also help (slightly) with blending the colors. Finally, if you want to, embellish your mani with studs or glitter!


Ta da! You're all set with an eye catching mani! 

What do you think? Do you have any secret tips for achievement the perfect gradient? 
Monday, January 20, 2014

The Nail Rock Glitter Sequin Kit

Happy MLK Day! It's very rare that I have a holiday from both work AND school, so I'm really enjoying my long weekend...by doing lots of nail looks! Today I used one of my Birchbox samples, The Nail Rock glitter sequin kit, to create one of my most sparkly accent nails yet!


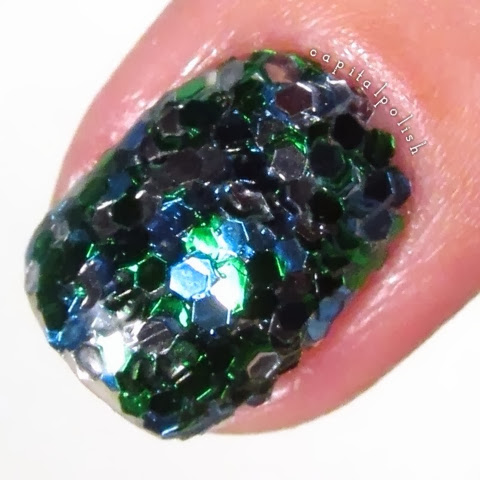
The Nail Rock kit comes with a pot of glitter, (mine was a mixture of green, aqua, and silver) a special glitter-grabbing base coat, and a brief set of instructions. I applied one coat of the base coat over my normal base of Nailtiques 2, then rolled my finger in the glitter pot. I used my regular clean up brush to brush away excess glitter, then topped with HK Girl Topcoat to seal everything in and give it a high gloss. I paired this outrageous accent nail with a somewhat subdued gradient of Zoya Chantal and Hunter, and added circular silver studs from the Born Pretty Store. 


Though I'm not totally crazy about these two looks in combination, (the greens matched MUCH better in my head!) I do enjoy them independently. I've never done a full loose-glitter nail accent before, and it's a really simple way to get a super fabulous look. I do like the combination of glitter, and it was a good size for this type of application, and could also be used in glitter placement. The base coat that comes in the kit smells AWFUL, almost like superglue. It picked up a lot of glitter, but it took a long time to dry and gave me a headache. If I try this again, I will probably just use my normal basecoat. Also, by that logic, you're probably better off just buying individual pots of loose glitter (available for cheap from craft stores or the Born Pretty Store) rather than dropping $7 on this kit. 

Macro shot of my glitter nail. Again, I do like the look, and I'll probably do it again, and even look into buying more loose glitter to experiment. The base coat that came with the kit is going in the trash.

The Nail Rock glitter sequin kit is available from Birchbox, and comes in a few other colors and finishes, including velvet and microglitter. If you're interested in receiving monthly samples from Birchbox for only $10, sign up here!

Saturday, January 18, 2014

NOTD: Super Sparkly Half Moons

Good evening, nail babes! I did this incredibly glittery mani today to celebrate my (male) roommate's birthday...I'm not sure he'll appreciate it, but I hope you all will!


I used two of my untried polishes in this mani: Mermaid Lacquer - Shop Til You Drop and Zoya - Aurora. They turned out to be a totally glitterific combination.


Shop Til You Drop has a UV color changing base that goes from a light grey-purple to a bright purple in the sun and is packed with pink, purple teal, and holo silver glitters in various shapes. Since I did this so late, I'll try to get a sun shot of this tomorrow; these photos show three thin coats of STYD (on my middle and ring finger) in its indoor state. Jacquelynn of Mermaid Lacquer is AMAZING at packing her polishes with tons of fun glitter, and this one has just shot to the top of my favorites of hers. It's uncanny how much and what a huge variety of glitter applies with each brushstroke--absolutely no fishing necessary!


Aurora is a plum crelly polish with lots of holo glitter. I have a dismally low number of Zoyas in my collection, but I'm so glad to have added this one. Formula was fantastic; this photo shows two coats on my index and pinky finger.


And now for the macros! Just look at all those glitters, including the big and medium sized dots, my absolute favorite!


To achieve this look, I started by applying two coats of Aurora to my thumb, index, and pinky fingers, and three coats of Shop Til You Drop on my middle and ring fingers. I then used french tip guides to create a half moon using Aurora on my middle and ring fingers, then sponged on a gradient of STYD onto my thumb, index, and pinky fingers. Then I sealed everything with a generous coat of HK Girl Topcoat.


I think this is an appropriately celebratory look! Glitter makes everything better :) Have fabulous Saturday night, ladies!
Wednesday, January 15, 2014

NOTD: Polished by kpt - Plumeria

To lessen the blow of my full on nub-ification I decided to wear one of the new polishes I ordered from Polished by kpt's end of the year sale. It totally worked--throughout the day I found myself staring at my nails, especially anytime I put them under water. Plumeria is my very first thermal polish ever, and now I've got the bug and want them all! All photos show two coats topped with HK Girl Topcoat. Be kind about my sad little nubs!

In it's warm state, Plumeria is a silvery linear holo.


In it's cool state, it's a stunning muted rose holo with cool, purple undertones.


This photo (somewhat) shows the transition. Watching this happen is so entertaining! It's really amazing, and I'm impressed with how beautiful both shades are, and how well they complement each other.


And of course, a macro! I'm really getting the hang of this new camera, I think.


I was planning on putting some nail art over this, but it was so lovely and delicate on its own I couldn't do it.

The Polished by kpt online shop is currently closed, but be sure to follow her on Instagram for updates about future releases!

Tuesday, January 14, 2014

Nail Honey Bee Day Trio

Today I have swatches of the Bee Day collection by Nail Honey, a trio of polishes celebrating the always fabulous Bee's 27th birthday! I wanted to order these polishes as soon as they were released, but I was in the middle of holiday shopping and hesitant to spend the money on myself. Once I had wrapped things up, I was delighted to see some were still available! Though I've long been a supporter of Nail Honey and have always been blown away by the quality of the polishes, this was my first time ordering glitter based/crelly polishes from Bee, and I was interested to see how they would measure up to her previous releases. Overall, I'm extremely impressed!

First is Crown Jewels, a mixture of silver, magenta, blue, and black glitters in a shimmery purple jelly base. Photos show three thin coats, some with and some without top coat (I will specify!). This is most true "jelly" of the three--the base is very sheer.


The reason I chose to show this polish without topcoat (above) is to show how seamlessly the coats combined, and how smooth the finished products looks on its own. Not that I'm complaining, but it is very common with glitter polishes that up to three layers of top coat are required to achieve a smooth finished look. Though this polish does not contain any especially large or unique shaped glitters that usually require that amount of topcoat, it's remarkable that a smooth look is achievable with absolutely NO top coat. The macro shot below was also before top coat, and shows just how many glitters appear in this stunning polish!


The next photo show three thin coats topped with HK Girl Topcoat. Again, not really necessary, but it does pack a punch of glossy shine, and allowed me to affix this cute rhinestone crown (purchased from Polished by kpt) decal as an accent!


Next up is 27 Candles, a peachy-nude crelly base with multicolored glitters. Photo shows three coats with top coat. I LOVE how many different colors appear in this polish, it really reminds of a birthday cake with rainbow sprinkles! The base was almost too opaque to be considered a crelly, but you can see where glitters from the first two coats barely peek through. The base also has a lovely warm shimmer. I'd really love to see the base for this made into a creme polish without the glitter.


While I definitely could see 27 Candles not being in everyone's regular use rotation, it's an extremely unique polish with a fantastic formula. If you like the overall look, you will definitely be pleased with this one. I added the taped triangles in the photo below to show case just how versatile it can be, and also topped with OPI Matte Topcoat for a different effect!


The last polish in the collection is 11:11, a royal blue crelly with lots of silvery shimmer and holo hex and moon shaped glitters. Photos show two coats with topcoat. Again, the base of this one was quite opaque for a crelly, and you could probably get away with just one coat. Sadly, I didn't swatch this one before a tragic break on my index finger, hence the uneven nub. :( But hopefully that won't detract too much from how gorgeous this polish is!


Again, royal blue isn't necessarily in everyone's wheelhouse, especially those who are restricted by work dress codes. But the color is vibrant and the formula is impeccable. If this is your style, you will love it! I probably wouldn't choose to do a full mani of this again, but I definitely see potential for using it in nail art or as an accent nail.


These polishes are all still available for individual purchase on the Nail Honey site, and 11:11 is on sale! You can also follow @nailhoney on Instagram for future releases and promotions.
Thursday, January 9, 2014

a-england Briar Rose & Briarwood + Color4Nails review

I was recently introduced to the glory that is The Polished Perfectionist by my dear friend Rei. I was immediately enamored with every single photo on her blog (if you haven't seen it, forget my blog, go check hers out, NOW!) and physically needed some of the a-england polishes she raved about captured so beautifully.

Unfortunately for this yank, a-england does not ship internationally. But any international polish lover knows that where there's a will, there's a way, and this time, the way was Color4Nails! This was my first time ordering from the site, and since I had such a fantastic customer service experience, I had to share a brief review:

After throwing EVERYTHING on the site into my cart, then filtering significantly, I was ready to check out. I registered, selected the ever so convenient option to pay with Paypal, and bing bang boom, pretties were on my way...until disaster struck. Upon receiving my Paypal receipt, I realized that I had mistakenly left an old address from college as my default shipping address. In a panic, I immediately emailed customer service, explained the situation, and provided my correct shipping address. Then, I thought, it would just be a waiting game. My panic was not relieved.

To my surprise, I received a response within half and hour, assuring me that my polishes would be shipped to my current address. Mind you, this was the Thursday before Christmas, when retailers are bombarded with last minute shoppers and shipping nightmares. On top of this, my order shipped out that night, and arrived by the following Monday, again, amidst the shipping/shopping madness of the holidays. I am very satisfied with my purchasing experience from Color4Nails, and will most definitely be ordering again soon!

Now, on to the good stuff! It was truly a personal dilemma deciding which of these beauties to swatch first. I eventually decided on Briar Rose/Sleeping Beauty, a muted rose packed with holographic shimmer.


I've read other bloggers rave about a-england formulas, and I have to say I agree. This applied in two perfect, smooth coats, and I loved the level of control afforded by the brush shape. The polish was slightly sheer after one coat, but rich and opaque after two. I finished things off with a coat of HK Girl Topcoat.

The bathroom in my office randomly has excellent lighting for capturing holo polishes....I took advantage. 

My second selection was Briarwood, a deep brick red metallic with scattered golden holo shimmer. Formula for this one was also excellent, though a bit brushstroke-y, as is common with metallics. This was more apparent during application than once dry.


Unfortunately, I waited about a week between swatching Briar Rose and this, and some pretty bad chips and breaks happened in between, which is why my nails looks so nubby in these photos compared to the first ones. I blame the Polar Vortex. 


I love how complex this shade is. It's vampy, but not too dark, and the holo effect is really unique. 


Overall, I am a very satisfied customer with this purchase. Color4Nails was great, and I will continue to use the site as a resource for the international indie must-haves. And I'm obviously addicted to a-england polishes now, as I've ordered two more from a blog sale since making this purchase. The first step to recovery is admitting you have a problem, right?!
Saturday, January 4, 2014

My 2014 Blogging Goals

Since starting my blog in September, I've been through a roller coaster of emotions about exactly what I'm doing here. Some weeks I love taking a break from my other responsibilities to write up a post, while others it feels pointless and overwhelming. But, at the heart of it, I know blogging is a creative outlet that I want to maintain and grow with. I love to write, swatch, and and create nail art designs, and all too often I let life's craziness get in the way of that. So, to keep my eye on the prize, I'm setting some goals for 2014!

Maintain a regular posting schedule.
I care a lot about cultivating a successful career and maintaining my 4.0 GPA in grad school, and those two things will *always* be my priority over my nails. However, I make time to do my nails a few times a week regardless of what else I have going on, I'm just not consistent with blogging about what I'm up to. I'm going to start with setting the goal of at least one swatch and one nail art post per week.

Become more active in the blogging community.
I follow a lot of blogs, love reading them, and love how much I've learned from branching out from just posting and following nail giants on Instagram. However, I'm not the best about commenting and letting my appreciation be heard. I don't want to set an "x number of comments per week" goal because that just seems insincere. Instead, I'm going to make it a goal to check my dashboard daily, and to comment on any post that truly excites or impresses me.

Physically revamp and upgrade my blog's layout and features.
When I first started my blog, I spent a lot of time scratching my head and cursing at my computer because I couldn't get my blog to look the way I wanted to. When I finally found a layout that was marginally close to my original vision, I called it quits. Over the next few months, I plan on really improving the visual aspect of my blog, and making it more appealing and user friendly.

Master my new camera.
This one isn't so much a goal as a necessity. :) I impulsively bought myself a fancy new digital camera (for blogging and for life happenings!) and I want to use it effectively and correctly. 

Feature at least six indie makers with swatches and an indie maker spotlight.
So far I have had the great pleasure of featuring four talented and fascinating indie makers, and those posts were by far the most fun to prepare. I hope to keep this as a regular feature of my blog. And to any indie makers reading this that would be interested, definitely contact me! I have previously featured Michelle of Laquerlicious, Jacquelynn of Mermaid Lacquer, Rachel of Cinema Swatch Lacquers, and Bee of Nail Honey.

Host a challenge and a contest.
Just because it sounds fun! Keep your eyes peeled for announcements about this!

What are your goals, blogging or otherwise, for 2014?

Juice Box Lacquer - Whoops, It's Christmas!

Happy New Year, everyone! Today I have three polishes to share with you that I chose from the Juice Box Lacquer Christmas collection, hilariously titled "Whoops, It's Christmas!"

First up is Tree Balls, Hold the Tree, a glitter topper in a clear base consisting solely of glorious multicolored circle glitters. Be still my heart!


In these photos, I have two dabbed layers over OPI - Don't Touch My Tutu, topped with Seche Vite to smooth everything out. It was very easy to get a good variety of glitters with each swipe/dab, but I did find the clear base to be a bit thick. You can see where bubbles appeared, especially over my middle and ring fingers. Because of this, in the future I will probably place glitters individually rather than dabbing, or use a sponge to soak up some of the base. 


Here I sandwiched Tree Balls, Hold the Tree between layers of Don't Touch My Tutu and topped with OPI Matte topcoat. I absolutely love how soft and whimsical this looks! Also, the layering and matte top coat made those pesky bubbles less visible.


This beauty is Golden Candy Canes, which contains yellow/gold and red matte hex and small dot glitters in a shimmering white crelly base. Photos show three thin coats with top coat, with minimal placement of larger glitters on the top layer. 


This one is so delicate and gorgeous, I only wish I had better captured the shimmer of the base! Application was perfect and even, and the base is the perfect balance of opacity to mute the layers below while still letting the glitters peek through. 


Though this is certainly the most obviously Christmas-y polish that I bought from the collection, I could see this incorporated into manis year round. It's really so pretty in person!


Last is my favorite of the three, Stairway to Holo Heaven, or as I've lovingly abbreviated it, S2HH. It is a glitter topper in a clear base with tons of small holo hexes, and larger holo dots and stars. Here I have two dabbed layers over Smokey Mountains Lacquer - Showstopper.


Hellooooo holo!! How could this one not be my favorite? It combines holo and circle glitters, and it really doesn't get much better than that.


As with Tree Balls, Hold the Tree, the base for S2HH was on the thick side, but still workable, and so worth the effort! While this one certainly lends itself to the holidays, I can't imagine limiting its use year-round, it's just too sparkly and magical!!


S2HH was also featured in my New Year's Eve mani! As I suspected, the thickness of the base was made much easier to work with by applying with a make up sponge. I applied S2HH on the tips of my index and pinky finger (over a black by Sinful Colors and a white by Wet'n'Wild) and used OPI - My Favorite Ornament as the accent, and over a taped "x" pattern on my middle finger.


One more shot of my NYE mani in the sun! I really loved this one!

These polishes aren't currently available from the Juice Box Lacquer's Storenvy shop, but be sure to keep checking there and on Instagram for updates, as Bre has hinted that they will appear either on clearance or in mystery boxes in the near future!